I’ve been playing with “structure from motion” / “photogrammetry” apps for a bit. Lots of stuff still to figure out, but here’s a possible interesting path. Note that none of this is optimal – wrong camera, wrong print medium, etc – but its fun.
1. Start with a Video of walking around The Dude Abiding.
[youtube=http://www.youtube.com/watch?v=XkrIkdK0kjI&w=448&h=252&hd=1]
He owned the copy of Lebowski that I watched, so I associate him with the Dude
(His name is Joel, he’s one of my coworkers, he also teaches kids how to code)
2. Using VLC, play then Shift-S to snap, then plan, then Shift-S to snap, to extract a bunch of frames.
![2014-04-18 14_32_47-F__2014_3dmodels_joel 2014-04-18 14_32_47-F__2014_3dmodels_joel](https://geekygulati.files.wordpress.com/2014/04/2014-04-18-14_32_47-f__2014_3dmodels_joel_thumb.png)
3. Load them into Agisoft PhotoScan ($179, or you could go 123D Catch from Autodesk, that one is free, but possibly less accurate?). Run “Align Cameras”, get point cloud.
![2014-04-23 16_27_44-joel.psz — Agisoft PhotoScan 2014-04-23 16_27_44-joel.psz — Agisoft PhotoScan](https://geekygulati.files.wordpress.com/2014/04/2014-04-23-16_27_44-joel-psz-agisoft-photoscan_thumb.png)
4. Crop in the model box, hit Build Dense Cloud. This is where it starts to look really interesting.
![2014-04-23 16_28_03-joel.psz — Agisoft PhotoScan 2014-04-23 16_28_03-joel.psz — Agisoft PhotoScan](https://geekygulati.files.wordpress.com/2014/04/2014-04-23-16_28_03-joel-psz-agisoft-photoscan_thumb.png)
5. Build a Model .. Build Texture. This is what the result looks like at “medium” resolution:
![2014-04-18 14_32_30-Untitled_ — Agisoft PhotoScan (demo) 2014-04-18 14_32_30-Untitled_ — Agisoft PhotoScan (demo)](https://geekygulati.files.wordpress.com/2014/04/2014-04-18-14_32_30-untitled_-agisoft-photoscan-demo_thumb.png)
Not the greatest, but that’s because of the camera I used (video compression = artifacting = bumps) plus camera lens distortion etc.
6. However, that doesn’t work for what we’re doing next. I don’t own a $10k color 3d printer. So instead.. paper!
Build a model at lower resolutions:
![2014-04-23 16_28_23-Build Mesh 2014-04-23 16_28_23-Build Mesh](https://geekygulati.files.wordpress.com/2014/04/2014-04-23-16_28_23-build-mesh_thumb.png)
![2014-04-23 16_28_49-joel.psz — Agisoft PhotoScan 2014-04-23 16_28_49-joel.psz — Agisoft PhotoScan](https://geekygulati.files.wordpress.com/2014/04/2014-04-23-16_28_49-joel-psz-agisoft-photoscan_thumb.png)
Don’t forget to close holes! (tools menu) … build texture…
![2014-04-23 16_29_00-Build Texture 2014-04-23 16_29_00-Build Texture](https://geekygulati.files.wordpress.com/2014/04/2014-04-23-16_29_00-build-texture_thumb.png)
![2014-04-23 16_29_51-joel.psz_ — Agisoft PhotoScan 2014-04-23 16_29_51-joel.psz_ — Agisoft PhotoScan](https://geekygulati.files.wordpress.com/2014/04/2014-04-23-16_29_51-joel-psz_-agisoft-photoscan_thumb.png)
7. Export the model. This is the $179 pay for step in Agisoft PhotoScan.
![2014-04-23 16_30_16-Export Model - Wavefront OBJ 2014-04-23 16_30_16-Export Model - Wavefront OBJ](https://geekygulati.files.wordpress.com/2014/04/2014-04-23-16_30_16-export-model-wavefront-obj_thumb.png)
Note that this saves both a .JPG and a .PNG texture. JPG on the Left. I might be mistaken, but I think they were saved at the same time. Actually, the .JPG might be the overall “build me a texture”, and the .PNG is the “export my model to wavefront”. It’s a little freaky.
![joel joel](https://geekygulati.files.wordpress.com/2014/04/joel_thumb.jpg)
![joel joel](https://geekygulati.files.wordpress.com/2014/04/joel_thumb.png)
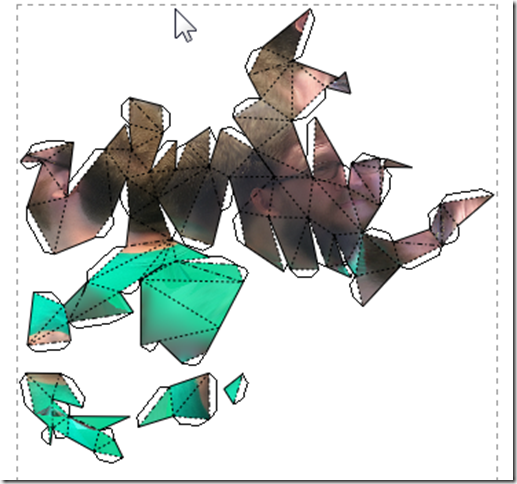
8. Load the .OBJ into Pepakura. $39, I totally plan to buy it.
![2014-04-23 16_31_47-joel - Pepakura Designer 3 2014-04-23 16_31_47-joel - Pepakura Designer 3](https://geekygulati.files.wordpress.com/2014/04/2014-04-23-16_31_47-joel-pepakura-designer-3_thumb.png)
9. Unfold, and Print:
![2014-04-23 16_31_55-joel - Pepakura Designer 3 2014-04-23 16_31_55-joel - Pepakura Designer 3](https://geekygulati.files.wordpress.com/2014/04/2014-04-23-16_31_55-joel-pepakura-designer-3_thumb.png)
10. Print it out on cardstock, cut, and fold ..
I haven’t done this part yet.
These screenshots were from my second attempt. Here is Joel holding my first attempt, which was 500 faces, a bit too complex:
![2014-04-23 14.25.40 2014-04-23 14.25.40](https://geekygulati.files.wordpress.com/2014/04/2014-04-23-14-25-40_thumb.jpg)