Using blender to make 3D font thingies to print at Shapeways

Posted in a how-to video here:

[youtube=https://www.youtube.com/watch?v=muMX3byfJ9o&w=448&h=252&hd=1]


0:00 Intro
0:49 Choosing a Font
1:06 Blender the inadequate Intro
2:00 The “Fast” route that doesn’t always work
6:07 “Reliable” way
9:40 Deleting Inner Shells
10:43 Exporting to Shapeways via OBJ – No Texture
12:00 UV Mapping, Texture
15:31 Exporting to Shapeways via X3D – With Texture

Having now finished the video, it occurs to me that using a picture as texture would work very well with cylindrical or spherical mapping.

While in this video I’m focusing on printing at Shapeways, its possible to print at home – just export to STL.  However, Shapeways uses a different process which allows for filler material which makes supports a lot easier for this kind of complexity, compared to the FDM process I would use at home on my Solidoodle.

Video captured using Open Broadcaster Software; edited down using Premiere Pro.

Getting Photoscan to Work: 3/N

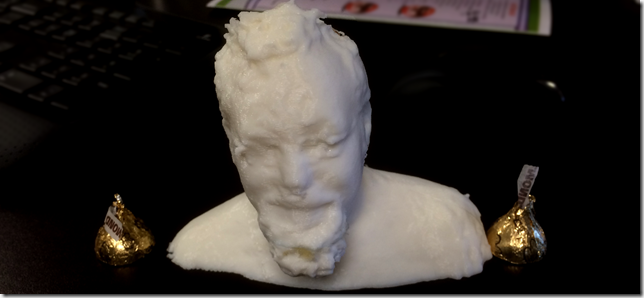
Good news!  Using a Nikon camera with a 55mm lense, I got pretty good (printable) results!

image
Subject:  Lamont Adams

Here’s how it went down:

  • I borrowed Dan Murphy’s Nikon DSLR Camera.  He had several lenses, I chose the 55mm lens (not prime; I just didn’t zoom it)
  • I sat the subject in an empty room in the center beneath four fluorescent lights.   By sitting them, they stay stiller; and I am taller, so I can get more details of their hair.
  • I started taking pictures from their back, so that the pictures across the front are contiguous / seamless.
  • I took 3 extra pictures from the front from a lower angle, to get nose and chin details
  • image
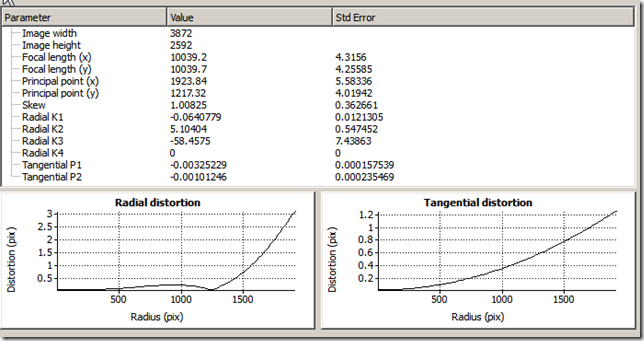
  • I took Lens Calibration pictures starting from as far away as possible; and got a lens profile.  I did not fit k4.
  • image
  • image
  • I used High accuracy matching and a Medium Point cloud; Low polygon count mesh (20k)
  • Minor editing of point cloud before meshing and closing holes (deleting floaters and fixing hair)
  • Export mesh to Wavefront .OBJ format; use Blender to rotate it and convert it to STL; export STL at 100x scale
  • Netfabb to clean up the STL and scale it precisely (100mm height)
  • 6 hours to print it.

I have ordered a small full color print from Shapeways to see what that looks like.    Should be here June sometime.

He looks kinda like the KFC Colonel.  What with that chin growth and all.

Addendum:   Instead of a 4/N post, I’ll just put him here:  Yellow Dan the Pirate Man with those dark sunken eyes.

image

Frustrated about 3D Stuff

General feeling of frustration tonight (time of writing: Friday 5/9).  Hard to put into words.  But I could draw it.  (might need to zoom in)

3d printing roadmap

  • The Green things are things that I have figured out.
  • The Red things are things that definitely have not worked for me.
  • The Yellow Things are things I want to be able to to.
  • The Orange things are things that I haven’t yet figured out.   They depend on each other, there is usually a chain.
  • I forgot about Minecraft Prints.  Those fall under “Color print that I might could afford”, pretty much.

Latest Frustration Tonight

It turns out a Agisoft PhotoScan project file (.PSZ) looks like a ZIP file, with a doc.xml, which has the below structure – so I could write code to hunt through 1420+ images, and select the best 50, spread out.

image

The code looked like this (sorry, no LINQ, going old school here, command line parameters, etc)

image

Except that the PSZ not really a Zip file.  When I tried to stuff the modified doc.xml back into the .PSZ file, it came out as being corrupted.    Dead End?  Retry with 7Z?   Extra metadata?  older compression format? ?

I guess what I have is code that tells “which cameras I should enable”.   That’s workable, except that I need to grab frames/image[@path] so that a human could identify it. 

Future: Maybe I could write code to read the video, figure out the quality of the frames, and only extract the best frames?

Also: the $3000 version of Photoscan has a Python Scripting interface.  Sorry, I’d rather buy a color 3D printer than that.

However, good news, it looks like I might finally have a lens profile for a GoPro Hero3 in 720p (x120FPS) Wide mode.  I had to play with the focal length, for some reason numbers like 0.1mm and 2mm work way better than 7mm that folks advertise.   More to be proven later.

Slicing and Dicing with OpenSCAD

In my quest to make a cool coaster, I wanted a way I could slice up a model so that each face could be printed, well, “face-up”, so I don’t run into problems with overhangs and supports and stuff gumming the works.  I would then glue the model together later.   (In the case of Coasters, I can also swap filaments and have the design “pop” on each side)…

In the process, I learned some OpenSCAD:

  • F5 = “quick”, F6 = slow and build
  • No such thing as “export this object”, it just builds and then you can choose to export everything.
  • variables are lexically scoped, ie, more like constants.  There are some dynamic variables as well.
  • I had to remember some algebra.
  • I applied some D.R.Y.

Here’s the result as applied to http://www.thingiverse.com/thing:60728 – first in “ShowMe()” mode:

image

And then SliceEverything() mode without the full fledged CSG operations:

image

And then SliceEverything() in the way that I could export an STL:

Yeah, that crashed.   It was too complicated.  I hate to take out the // Slice Everything, and instead, here’s just the front and an ear, exported to STL, and viewed in NetFabb.

imageimageimageimage

Note: Its NOT fast, when doing the full build (F6).  It also crashes less if run from command line – apparently the crash is during rendering to the screen?)

Show Me The Code

Since its getting a bit long, I’m linking to github below; but this is what it looks like, approximately:

imageimageimage

link to code at github

update:  I’ve tried to use this approach for several things now, and … its very fragile.  So fragile, that I have successfully used it to create a print.  Almost every model is “too complex” and fails at render.  I might need to try a different language.. something that is rock solid. 

UnClogged 3D Printer: Part 5: Back in Business

We’re back in business!

The last time I had tried to print something, I noticed a bunch of smoke coming out of “C” in the diagram below.  And things were dripping too freely.  I had the thermister at position “A” below, just how its supposed to be.

image

Thanks to acquiring a digital thermometer capable of measuring temperatures up to 200C, I was able to read my own temperatures – and sure enough – Fred in this chart.  The real temperature in the barrel was much higher than was being read.  Why?  This makes no sense!

Well, luckily I had watched a video on how to put a print head back together, and it turns out that I had not looped some Kapton tape around the nozzle first, I had put the thermister directly on there, and then covered it up with tape.      I tried it the other way:  One loop around with tape, then the thermister, and then another layer of tape, yielding sample Barney.   (I also put the fiberglass insulation (tattered, but still in one piece) on it like they suggested.

Sample Thermister Location Temp (C) Reference Thermometer location Temp (C)
Fred A / Direct 130 C 170
Barney A / Kapton 130 C 125
Scooby B 130 C 125

Much better!   We’re in business.. almost.   While printing, the tape gave way and the thermister fell off. 

Why, I wonder?   My guess is that by having one loop of kapton tape, and kapton tape is a good heat transfer agent, it gets to sample the average heat from all around the nozzle, all around the thermister, rather than just one side of the thermister.  Or something like that.   Or maybe there’s just a bad spot on nozzle and I was unlucky.

I tried taping it back on 2 more times.  No luck.  I seem to have done something to the print head, the wires are shorter now, and after much cursing and screaming, I gave up.

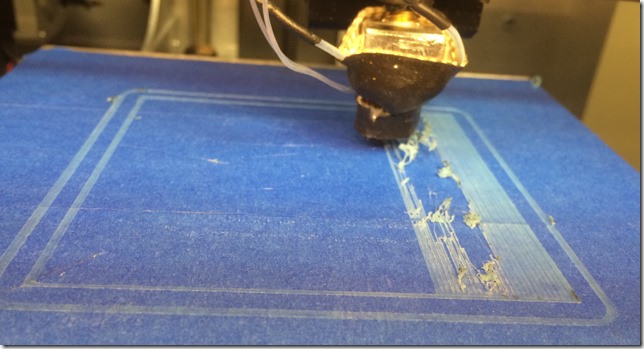
Instead, I put the thermister in at location “B” – inside the fiberglass insulation, which held it snugly in place – and yielded sample Scooby.   We still seemed to be in business.   And here it is, printing:

image

The URL to the above camera is https://www.dropcam.com/p/sunnywiz, although there is no guarantee that it will be pointed at a geeky subject at the time this post posts.

(Those things in the picture, btw, are thingamabobs (technical term) that Jason needs in his Arcade machine build)

Yay! so now that its back to working again, what now?  Hmmm..

For future time historians, the list of all posts on the clog:   http://geekygulati.com/tag/3d-printing+clog/
Clogged 3D Printer: Part 4

Jason did a great job on the nozzle, but after I had it up and printing (nicely), i noticed a trail of smoke coming from the PEEK barrel.  (Why the heck is it named that?)

image

I think I have the barrel too far up into the PEEK thingy, and the heat is heading up there and melting things.

Also, with the thermister dialed in for 140, the plastic was dripping freely … i suspect that things are MUCH hotter than they are registering at the moment.

I might need a secondary source to determine real temperature.  I wonder if my IR gun can get close enough for an accurate reading.

Clogged 3D Printer: part 3

@jstill is the Man.

image

Here’s what he did to unclog the nozzle.

  1. Put it on the Grill, for a while, at 700 degrees or more.     At the end of this, it still had black stuff all over it.  (Much better than my idea of the oven.. no wife being annoyed at me for stinking up the house)
  2. Tried to remove the black stuff with ____ (I didn’t quite catch it) and Mineral Spirits.. didn’t work.
  3. Had a Eureka moment, realized it was all carbon, so he used Hoppe’s No. 9. Gun Bore Cleaning Solvent. A single wipe, and it all came off.
  4. ‘Tis beautiful.

I think for good measure, I’m going to pick up some guitar strings and run floss it as well.   Then put it on and test.    This time, definitely tighter on the barrel .. I think it was loose, when I removed it, there was filament where filament ought not be.

Excited. 

Clogged 3D Printer Part 2

Well, we tried.  And its better.  But it ain’t fixed.

Here’s the first bits of print that came out of it.  You can see the dark stuff that was either the old filament or burnt:

image

However, the stream of filament coming out the end keeps varying.  Sometimes its good, and then other times it fizzles out:

2014-04-24 05.12.00

Conclusion: There’s something still clogging the bottom thing.    More work needs to be done.