Clogged 3D Printer

Problem Discovery

The other night (Time of writing minus 4 days), I set up a hi-resolution Black Dalek print in motion.   I also pointed the Dropcam at it..  what I saw at 8am the next morning Shocked and Amazed me!

[youtube=http://www.youtube.com/watch?v=p1CG_YUcnsA&w=448&h=252&hd=1]
Keep on printing… Keep on printing… (Dora)

(clog at 1:19 or so, but its hard to tell)

2014-04-18 08.56.27The head was swooshing and swishing unrestricted in the air.. no plastic coming out.  But, the filament still seemed to be attached.  (in the past, the reel had developed a bind that had pulled the filament out of the printer)   What?   My first clogged head!    (10,000XP monster!)  

(I still got some good parts out of the print):

Problem Investigation

Here you can see the stripped filament where the gear could not push it in any further:

image

This was as far as I had disassembled the printer before.. knowing I could buy a new print head for $59, I went for the full disassembly.   I referred to several videos online, especially this one:

[youtube=http://www.youtube.com/watch?v=nQohJtS4wrE&w=448&h=252&hd=1]
Thank you Ian Johnson

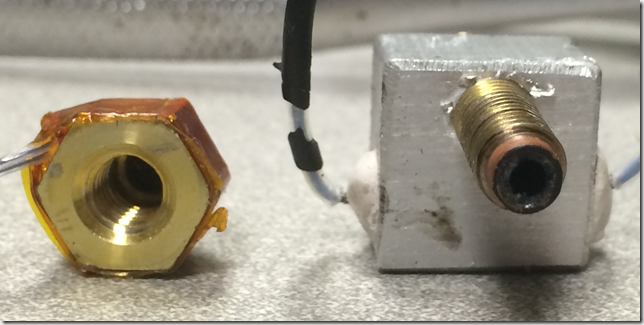
I successfully exploded it everywhere and got down to the offending parts:

imageimage

image

Now what?   I’m using PLA, so I couldn’t soak in acetone..

De Clogging Solution

Just for the heck of it, the wife and I tried using a candle flame to localize heat up the barrel.    It worked.  First try.  The glops globbed out.  The glips gleeped.   The wires were not affected.   There was much rejoicing.   My wife is awesome.

There was a clog in the peek barrel as well .. I had to use a nail, and then a really small hex driver, and a hammer, to get that one out of the way.  It worked.

I did hook up the barrel assembly to the heaters and test them before I started putting everything back.  It was a little hard to push by hand, but the filament did make it all the way through.  Large glops of black ink (I think the black is VERY inky) came out – I suspect I’ve been running it at too high a temperature, and magic happened, and a lot of ink collected in the barrel.

The Adventure Continues

I’m in the middle of putting the printer back together. 

Luckily, I used a sharpie at a diagonal across the 5 clear pieces so I could figure out how to put them back.   One of them broke, a bit, not too serious, I don’t think.   I’ve stopped at the point just before I put the extruder motor back on.  I expect I have to recalibrate the z-distance, because I’m pretty sure the barrel is now sitting lower than it did before.   Luckily I had Kapton Tape that I could cut up to reattach the thermister.   Hey There, Mister.  

I’ll get a chance to play with it again in 2-4 days.  I hope I can get it back together.. I got my second ever “actually useful” thing to print (for a friend’s arcade machine build).   And I want to do some more name coasters.

A Coaster of My Name

Playing with font extrusion.. trying to make interesting shapes:

image

I did this by combining 4 things:

  • “SUNJEEV” extruded (default font)
  • “GULATI” extruded (default font)
  • a box, squished, to make the base plate (the “J” is taller than the rest)
  • A sphere, removed from the result, to make the “dip” in the top

This was all done in blender, then cleaned up in Netfabb, and then printed.

The drawback is there’s a LOT of support structure to remove.  I might try printing it on end with the fonts facing “up” at a 45 degree angle, but then I run into stability problems. 

image

This shows the bottom.  The previous print had been dark blue (a TARDIS Chess set, if you must know, printed by Joel), and when I changed to the light blue (throw away) filament, I just let it do the color change while printing.  I like the effect!   It hardly ever lasts more than a layer, so I might keep doing that, its fun.

Its not really a Coaster.  Thanks to the dip, cups don’t sit well in it.  Need to inset it with a square next time. Or a cylinder, and make it bigger.

I wish I could do multicolor prints.

Timelapse of Ames 3d print

Thanks to DropCam and a $10/month subscription, I have a 7 day window that I can create Time Lapses from.

The Dropcam has a hard time focusing this close, so it’s a bit blurry. You can see the pauses and filament changes in the video.

[youtube=http://www.youtube.com/watch?v=VgyZ8fEe70M&w=448&h=252&hd=1]
Caps are Shunned!

I’ll point the camera out the window and see if I can come up with some other cool timelapses.

Topological Relief map of Ames, multicolor

I did a random search for “Ames” in Thingiverse and I found this gem: http://www.thingiverse.com/thing:171194

image

Seeing as I grew up in Ames, IA .. heck, I have two jobs and one house and my disc golf course on that map.. I was super excited to print it out.

Unfortunately, the model is HUGE and it has some problems.   I did what I could on short order .. 6.5cm (no scaling), at 0.3mm resolution.    I did use the three colors I had, by injecting some code into the generated gcode:

G1 X155 F4000
@pause

And this was the result:

image

Pretty nice as far as “striking”; fail in terms of detail.  I could do better.. XY scale x2, and 0.1mm depth?  Subdivide into N prints to get the XY resolution right?  I might need a bigger computer first, to do the slicing.. it topped out at 2.5GB of memory used, and “the wee laptop couldna’ handle it” (Scotty, Star Trek) (Nuclear Wessels).

Nephew likes Lebron

My nephew loves LeBron James, so I pieced this together for him.

I got the logo and basketball from thingiverse.  The logo was a bit tricky – it was a cellphone cover.  I had to “extract” it by differencing it from a block, and then scaling the block up.   The basketball needed to be squished a bit.

I combined the number six, a cone (base to help it stand), the logo, basketball, and his initials for the final. I printed it in black till about 5 hours in, then switched filaments for white.

Delivered yesterday. He liked it.

20140414-232939.jpg

Cube of Letters

In an effort to post more often, with half baked semi successful projects rather than comprehensive completely solved ones, I give you:

20140414-231547.jpg

The idea was to take each letter and extrude it, cutting it out of the square. Having three letters lead to some juicy geometry on the inside…

The fail part is, I could not dig the supports out. A thin piece snapped off as I struggled with it. I would have to print it in sections and glue it together.

Also note that the interior has shells that are not joined to the exterior.

My next attempt is/will be a coaster. Of my name. I would like to get it such that I can print it without supports.

Tools used for this: Blender.
Workflow: add text, convert to mesh, remove doubles, mesh cube, Boolean, difference, export to STL, net fab, repair, export part.

3D Printing Adventures

It has been forever since I posted.   Life has been happening – first, my we had a vacation in Florida.  Then, my step father died.  Then, my cat died.   And I’ve been trying to catch up ever since.  I’m not caught up yet.

Just before all of that happened, though, I had started playing with a 3D printer.   I left off with almost getting a successful print of a LEGO block.

Since then, an abbreviated list of what I have learned:

PLA is Awesome

It is much, much easier to print larger parts with PLA.    It works very well on the Solidoodle:

  • Brought the extruder temperature down to 175 or so (hint:  watch for signs of oozing as the extruder warms up, and you’ll know what the safe zones are)
  • Print cold on Blue painters tape.  However, for larger prints, they do peel slightly, so its sucked the tape off the printbed before.
  • Print 85C on heated bed.   Sticks VERY well, to the point of ripping Kapton tape off for big prints.
  • PLA holds more heat in, so it stays soft and droopy for longer than ABS.  Thus, adding an external fan (thank you Step Son for giving me your extra fan) cools it down quicker and prevents drooping and lets the layers continue to look crisp.
  • PLA smells better.

The Best Infill was Rectilinear 20%

I did the same print over and over with different types of infill.    The best, most consistent one was rectilinear – which ends up looking like a bunch of squares.  The other fancy ones.. HilbertCurve, OctaSpiral – cool ideas, but very often ended up with unsupported infill layers, which lead to lots of droop and havok on the inside.  

imageimage

imageimage

This was partially motivated by large ABS prints lifting all the time, I was trying to figure out “least infill possible”, but in the end, PLA solved that problem.

Home Depot did not carry M3 screws

And thus I had to special order those from Amazon.  This is to get a longer Z-stop screw so that I could clip on a glass plate or other such thing to the print bed.. so that I can prep a plate, rather than prepping a print bed, for a print.   I’ve heard that ABS on Slurry on Glass and PLA on heated glass are awesome.  I still need to get some glass – a friend suggested picture frames.   #pendingExperiment

Printing Models and Finish Them Is Fun

So far, I’ve done two Yoda’s, R2-D2, a Dalek, a Weeping Angel, and a TARDIS.

Camera Uploads

I’ve done some painting with Enamels now;  I have more to learn about Acrylic and base coats #pendingExperiment.

image

The best part is giving them away (if I don’t want to paint them myself) to other people who would love them and keep them and call them George.

And that’s all the time I have to write for now.    Later!

Solidoodle: Printing a Lego-Like Block: Success

First, what are the actual measurements we must match?   Taking multiple measurements: Mesauring Brick with Caliper

  • A: Diameter of a nubby: 4.92mm, 4.90, 4.89, 4.89
  • B: Width and Length of a 2×2 square: 15.84mm, 15.89mm
  • C: Height of a brick (ie, 3x a thin): 9.57mm, 9.59mm

Then, using NetFabb against the model (click image to for link to ThingiVerse): parametric_lego_2x2_preview_tinycardMeasuring in Netfabb

  • A: 4.8mm
  • B: 15.8 mm
  • C: 9.6 mm

My guess is that they reduced the size of the nubby because it would ooze a bit; the other two dimensions appear to be about right.  

And the printed out ones:

Slice Scale Flowrate A B C Fit?
0.3mm 1.0 0.6 4.67, 4.82
4.69, 4.79
16.07
15.93
9.64 mm Very Loose

Interesting!  The nubbies are coming out a bit smaller, but the part is a bit bigger.   The height is within 1 layer of where it could or should be.

Now, I want the part to print out nice and snug.  Its hard to measure, but it looks like the receptor diameter for tne nubby is about 4.8mm – ie, they’re using a flex of about 0.1mm to keep things snug.  So, I want to print out with a diameter above 4.8mm.

Lets try something at Flowrate 0.65, just to see what happens:

Slice Scale Flowrate A B C Fit?
0.3mm 1.0 0.65 5.02, 4.8, 4.95, 4.86 15.93
15.84
9.73 Pretty good!

And what do you know!  It fits!  Pretty snug-gly!

3 bricks in a row

Although, due to a hole in the original .STL file, the entire bottom of the piece got replaced with a solid face. 

The missing bottom

Mission Accomplished.   0.65 might be the answer, although it disagrees with the single-wall-thickness calibration.

Solidoodle 2 Pro 3D Printing: Frustrated

2014-01-19 11.09.56

I am having difficulty

  • My Lego-like pieces are not sticking to each other, let alone to regular Lego’s.
  • Many many of my prints are curling up from the bed.
  • My 4? 5? attempts at an iPhone case so far have been incorrectly sized
  • My hexagonal infill is not pretty.

Here is What I have Learned

  • When printing really large parts, be aware that ABS filament shrinks.  For example, the XY(Z) thing above was 2” while printing (measured with caliper), but as it cooled from 210C down to 27C, it shrunk to 1.98”. 
  • Enclosures are very important at keeping heat in, which helps a model not-shrink too quickly.  Quick shrinking can lead to bends in the structure.  
  • As the ABS shrinks, in larger parts, the top shrinkage can pull the bottom part off the bed.  There are ways around this.. rafts, permiters, skirts, windex cleaning, hairspray sticking, kapton tape, and the heated bed.. As of yet, i haven’t figured out which combination of things will get me a reliable bigger print.
  • The Doodle was pretty well configured when i got it.  And my tinkering has made it worse.  

Of Flow Rates and Stepper Motors, Oh My

As of right now, I’m refusing to learn how to flash/reprogram the eeprom in the doodle.    Luckily, the number of steps for the X Y and Z axes are almost dead on.    However, the filament stepper is not – its pulling definitely more than  120mm for every 100mm it ought to be pulling.

Luckily, there’s a setting in slic3r that accommodates that – Solidoodle’s config files shipped with a default 0.6 ratio.  The result, I thought, was a bit blobby while doing infill. Also, all the documentation said I should have a 0.4mm nozzle, but the configuration was set at 0.5mm;  likewise, I was using 1.75mm plastic, but the config said 1.68.   

So, i “fixed” them.    And slowly, as I scream in 40-minute-delayed frustration, I’m setting them all back.  

Luckily, that’s all I’ve had to deal with.  Here’s all the things that Solidoodle did RIGHT with the printer, that I have not had to deal with.

  • Correctly configured stepper motor sizes
  • Correct power levels for the X/Y/Z/etc motors.. potentiometers.. something something.
  • Belts are correctly tensioned
  • Bed is Level
  • Bed is appropriate distance away. 
  • Nozzle assembly, no jams.

So, GOOD JOB Solidoodle.  You did good work here.

Dealing with Spooling2014-01-19 11.35.47

The provided spool holder – bit of a nightmare.   It mounts to the back of the printer, but with the XY going all  over the place, and with a brand new spool, the slack allows the cable to “fall over” on itself, and it gets wrapped up on the spool handle.  My initial solution was to hang a bungee cord from the rafters (I’m in the basement) and run the filament through that – so that gravity is applying a tension for me.  

My wife came up with an even better idea: Suspending the Spool from the ceiling with the bungee cord.

Lost My Sense of Direction .. Finding It

I feel like I’ve lost my sense of direction.  Where am I trying to go with this printer, and how do I get there?

Part 1:  An Education

I’m definitely getting that.   Hoo boy.  And I’m glad for it.   At some time.. next week? next month? I’ll be giving a Lunch and Learn at work on some, or all, of this stuff.. and taking the printer in to work so that other folks can use it, possibly to print their own printers.    After what I’ve experienced, if I was to do this again, I’d plunk down the extra money and get an even more pre-built solution – like the Doodle ‘4.   I hate messing with stuff.   Good luck you guys.

Part 2: Specific Goals

To clear my head up .. which way do I need to / want to go?  I need to get this back to being a pleasurable experience, even if I’m failing along the way.  (As my wife would say, stop being a booger!) 

I Want To [Print] Why? To Get there, I need to: Priority
Super Serious (not) Lego Minifig Scale model of our current house, possibly with cute little furniture. Something inside me.. about representing reality.  Its why I do video as well. Figure out how to print large prints without warping. C5
An iPhone case
4s_preview_tinycard
Because then I can print customized cases for my friends and love on them.  Q has already requested a Dragonball Z case. Get better at exact sizes, large model heat shrinkage, and printing large prints without warping. B3
Lego-compatible Blocks
3520480987_710d573c8d_o_preview_tinycard
Because I’d like to incorporate lego nubs on my models, so they are cool. Work on wall widths and flow rates, print some calibration pieces that “ought” to stick together, and work on bed lift B2
Super Action Figure
Jason_Welsh_action-4_preview_tinycard
For my nephew Cam, and for my inner 8-y-o. Just make time to print a LOT of prints.  And precision printing as well. C4
Pendant thingies Because its something my wife can doctor up and make into cool stuff. Already there.  Just need some design work in Sketchup. Which means I need a design from my wife of what the border should look like. Q1
Have things figured out enough so that Brandon and Doug can print their printer parts. I like being of service and enabling people to investigate cool technologies Large print bed lifting and precision. B1.5

So What is Next? (Given unlimited time)

  1. Play with their 0.6 ratio default, +/- for More or Less ooze. Figure out where the parts DONT fit, and where they DON’T stay together, and go halfway.
  2. Double check bed leveling and clearance.
  3. Print in 0.3mm instead of 0.4mm for a bit.
  4. Do some Pendants so that I have a sense of accomplishment.
  5. Print some connector parts, get the connections worked out.
  6. Retry the Lego’s after connectors are connecting.
  7. Retry the iPhone Case – with skirt, with raft?, add hairspray, foam core heat shielding, no scaling – measure – apply scaling and retry
  8. Retry a 2” or 3” print, try to figure out bed lift.  (Skirt, raft?, hairspray, heat shielding)
  9. Take over the world.

Make it so, #1.   

3D Printer: Solidoodle: Day #1

I received my Solidoodle 2 Pro yesterday.    I’ll spare the unboxing video.. suffice it to say, no instructions, but I knew that.  The instructions are online at http://www.solidoodle.com/start-here/ 

I had trouble with the print drivers at first.  I gave up, and switched to a laptop (the laptop that will go with the 3d printer to work when it goes) and it worked fine there.

Here are my first four prints (from left to right)

2014-01-15 09.38.40

  1. I didn’t have the printer homed correctly.   Ie, the printer thought it was at 0,0, but really it was at 100,50 or something.. so as it printed, it would hit the physical limit, and throw the print head off, and each successive layer moved out further.  
  2. I didn’t trim the ooze of plastic from the print head before it started printing, and that little strand of filament bunched up on the build plate.. which made an obstacle for the print head to bump into.. and then the build popped up off the plate.
  3. The build popped up off the plate during printing.
  4. Having borrowed my wife’s $18 Hairspray (she’s getting me cheaper hairspray today), I finally got a good print.   Thank you beautiful wife

The print is a request from my nephew Iman (@PokeIman_Master) .. it’s a Legend of Zelda Tri-Force.  This was done at 0.3mm resolution (the 3rd roughest).. you can see some of the lines don’t quite meet.   Its not 100% solid.. I used a 10%? 20%? honeycomb fill pattern on the inside.  Supposedly took 16cm of filament.. 21 minute print time, probably $0.20 of material.   I think I’ll be doing the same print again at 0.2mm after I do some calibration prints.

The print quality as compared to the Makerbot2 at LVL1 .. not as good, fer sure.  It might be the table I have it on (it shakes while printing), it might be the speed the printheads are travelling at, etc – there’s some tuning to be done.     Its technically the same print nozzle size, I should be able to improve quality.

I’m a wee bit excited.   It’s a good thing I’m not working from home today, I wouldn’t be working.   As it is, I need to stop writing this at get back to being billable.